1. Testing and the frontend
Test-driven development (‘TDD’) is in the mouths of every backend developer, as testing has finally assumed its rightful position as a ‘must-have’ of software engineering. Any company not utilising backend testing is behind the curve. However, this surge in interest has only recently begun picking up steam for the frontend. Anyone transitioning to frontend development is likely to feel very comfortable with unit testing, where specific components are checked to ensure they’re producing the right outputs. However, frontend E2E testing is an entirely different beast.
1. 테스트 및 프런트엔드
테스트가 마침내 소프트웨어 엔지니어링의 '필수'로서 정당한 위치를 차지하게 됨에 따라 테스트 주도 개발(TDD)은 모든 백엔드 개발자의 입에 오르내리고 있다. 백엔드 테스트를 활용하지 않는 기업은 모두 뒤처져 있습니다. 그러나 이러한 관심의 급증은 최근에서야 프런트엔드에 활기를 띠기 시작했다.
프런트 엔드 개발로 전환하는 사람은 누구나 유닛 테스트에 매우 편안함을 느낄 수 있습니다. 유닛 테스트에서는 특정 구성 요소가 올바른 결과를 산출하는지 확인합니다. 그러나 E2E 테스트는 완전히 다른 야수이다.
The key concept to understand in frontend testing is that we want to test results, not implementation details. In other words: does the screen end up looking how we want it to look, and doing what we want it to do? Great! We don’t care about specific function calls, state, or data structures here. We’re simply testing the user experience.
프런트엔드 테스트에서 이해해야 할 핵심 개념은 구현 세부 정보가 아닌 결과를 테스트하고자 한다는 것입니다. 다른 말로 하자면, 화면은 결국 우리가 원하는 모양을 보고 우리가 원하는 것을 하게 되는가? 좋습니다! 여기서는 특정 함수 호출, 상태 또는 데이터 구조에 대해 신경쓰지 않습니다. 사용자 환경을 테스트하는 것뿐입니다.
2. Arrange/Act/Assert
Arrange/Act/Assert is a simple way to approach testing, which can help you understand the basic process by which all tests (including backend!) are structured. They also form a good basis for explaining the basics as we move through our demo application. In short, Arrange/Act/Assert is a framework for structuring your tests.
The first step when writing a test is to ‘arrange’ the right environment. In our case, you’ll see we need to load up the page we want to test.
2. Arrange/Act/Assert
Arrange/Act/Assert 방법은 테스트에 접근하는 간단한 방법으로, 백엔드를 포함한 모든 테스트가 구조화되는 기본 프로세스를 이해하는 데 도움이 됩니다. 또한 데모 애플리케이션을 진행하면서 기본 사항을 설명하는 데 좋은 근거가 됩니다. 간단히 말해서, Arrange/Act/Assert은 테스트를 구조화하기 위한 프레임워크입니다.
시험지를 작성할 때 첫 번째 단계는 적절한 환경을 Arrange하는 것입니다. 우리의 경우 테스트할 페이지를 로드해야 합니다.
Next, we ‘act’ by doing an action (or series of actions) necessary to replicate how the user could interact with our app. Another way of thinking about it is that the ‘Act’ is the action we’re testing.
But of course, there’s no point loading a page, entering some data, and clicking “Submit” without actually telling our tests what we expect. Do we want Submit to result in a popup or a page load? This is where ‘assert’ comes in: we tell our test file exactly what outcome we expect, based on the actions in the previous steps.
다음으로, 사용자가 앱과 상호 작용할 수 있는 방법을 복제하는 데 필요한 작업(또는 일련의 작업)을 act합니다. 그것에 대해 생각하는 또 다른 방법은 그 법이 우리가 시험하고 있는 Act이라는 것입니다.
그러나 테스트 결과를 실제로 알려주지 않고는 페이지를 로드하고 일부 데이터를 입력한 다음 "Submit"을 클릭하는 것은 의미가 없습니다.
제출하면 팝업 또는 페이지 로드가 발생합니까? 여기서 assert이 필요합니다. 이전 단계의 작업을 기반으로 테스트 파일에 예상 결과를 정확하게 알려줍니다.
3. Introducing our example app
For the sake of this demo, I’ve created a small ‘MadLibs’ app with React. For those unfamiliar with MadLibs as a concept, it involves writing a short story with some gaps in it, filled with words entered by the user. The catch? The user doesn’t know how the words will be used! They enter the words according to what is needed (‘animal’, ‘food’, etc.) and then the author assembles them in a way which can produce some really weird and wonderful stories.
사용자가 입력한 단어로 채워진 약간의 공백이 있는 단편소설을 쓰는 것을 포함한다. 함정? 사용자는 이 단어가 어떻게 사용될지 모릅니다! 필요한 것(동물, 음식 등)에 따라 단어를 입력한 뒤 작가가 정말 기이하고 멋진 이야기를 만들어 낼 수 있는 방식으로 조립한다.
• Example MadLibs app without Cypress: https://github.com/AJMcDee/Cypress_Demo_BaseApp
In our app, we ask for ten entries from our user. Once they’re all entered, they can submit the responses and up pops a little story complete with their own words. That’s it. That’s the whole app.
With this simple example, we can demonstrate some basic functionalities of Cypress and create a jumping-off point for your exploration of frontend E2E testing.
Remember, we don’t care what component is loaded, what function is being called, what state is being used, or anything to do with code. All we’re testing is what the user can (or cannot) do.
우리 앱에서는 유저에게 10개의 엔트리를 요청합니다. 일단 그들이 다 entered하면, 그들은 답변을 submit할 수 있고, 그들만의 말로 완성된 작은 스토리가 팝업된다. 바로 그거야. 그게 앱의 전부야
이 간단한 예를 통해 사이프레스의 몇 가지 기본 기능을 시연하고 프런트 엔드 E2E 테스트의 탐색을 위한 점핑 포인트를 만들 수 있습니다.
어떤 구성 요소가 로드되는지, 어떤 함수가 호출되는지, 어떤 상태가 사용되는지, 코드로 어떤 작업을 수행하든 상관하지 않는다는 점을 기억하십시오. 사용자가 무엇을 할 수 있는지(또는 할 수 없는지) 테스트하는 것뿐입니다.
Does our page load in Cypress?
The first step to testing in Cypress is loading up your application. Luckily this is pretty simple! Firstly, we need to create a new test folder.
mkdir ./cypress/integration/0-my-madlibs
In this folder, create a new file with the ending .spec.js: this signals to Cypress that it will be a file running tests, and it will automatically appear in the Cypress GUI.
describe('The MadLibs Main Form', () => {
it('loads successfully', () => {
cy.visit('http://localhost:3000')
})
})
TypeScript
복사
Let’s talk about what is happening here:
describe is used to group tests which fit together, and it takes two arguments:
description은 서로 들어맞는 테스트를 그룹화하는 데 사용되며, 두 가지 인수를 사용합니다.
1.
a string where you literally describe what is being tested (e.g. component/page)
2.
a callback function which should include your test setup and assertions
테스트할 항목을 문자 그대로 설명하는 문자열(예: component/page)
test setup and assertions을 포함해야 하는 콜백 함수
it is what we use to indicate our individual tests, and it again takes two arguments:
이것은 우리가 개별 테스트를 나타내기 위해 사용하는 것이며, 다시 두 가지 인수를 취한다:
1.
a string which describes what the test should achieve
2.
a callback function with an individual test’s steps
test가 무엇을 달성해야 하는지를 설명하는 문자열
개별 테스트 단계에 따른 콜백 함수
cy.visit is a cypress command that tells the browser to go to the nominated address
cy.mess는 브라우저가 지정된 주소로 이동하도록 지시하는 사이프레스 명령어이다.
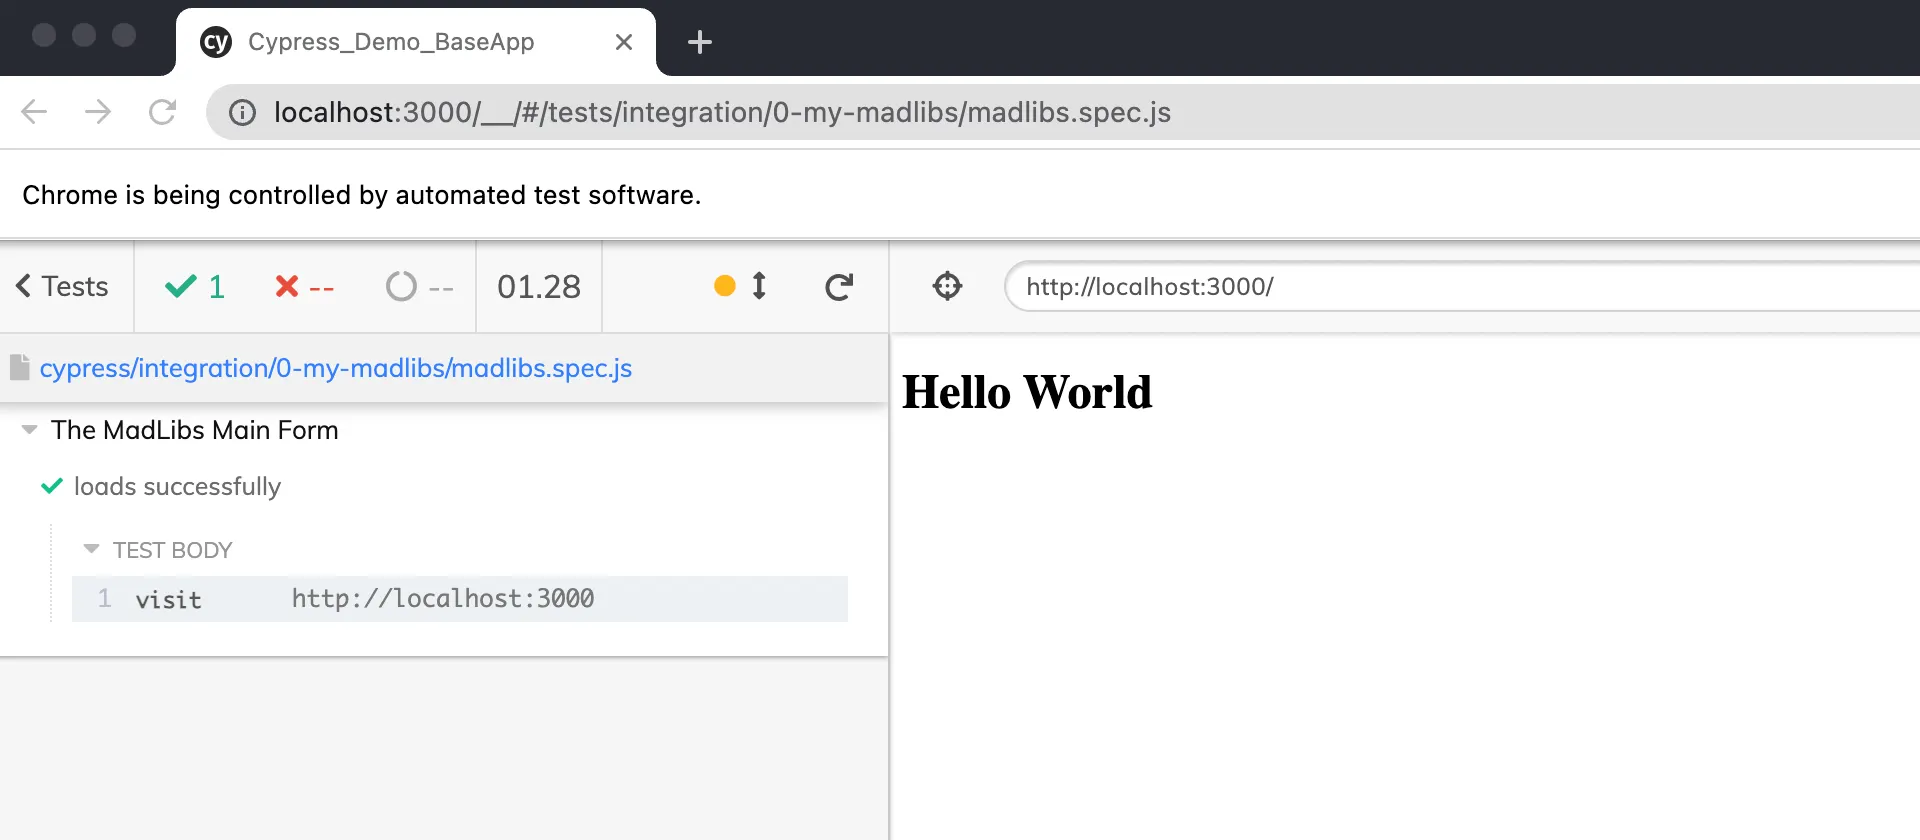
Right now, this isn’t actually testing anything. We are still in the ‘arranging’ phase at this point. Nevertheless, it’s important to know that this is working. Go to the Cypress GUI and click on the test. It should open a new browser window and display the page.
지금은 아무것도 testing하는 게 아니야 이 시점에서 우리는 여전히 arranging 단계에 있다. 그럼에도 불구하고, 이것이 효과가 있다는 것을 아는 것이 중요합니다.
사이프레스 GUI로 이동하여 테스트를 클릭합니다. 그러면 새 브라우저 창이 열리고 페이지가 표시됩니다.
Note that the test will officially ‘pass’, even though we haven’t asserted anything, because nothing has gone wrong.
In other words: Cypress tests always pass until they fail, not the other way around.
아무것도 잘못된 것이 없기 때문에 우리가 아무것도 주장하지 않았음에도 불구하고 테스트는 공식적으로 '합격'될 것이라는 점에 유의하십시오.
다시 말해서 cypress 테스트는 항상 실패할 때까지 통과하며, 그 반대는 아니다.
To make sure our form is actually loading, we may want to check that the navbar, header, table, and button are all there.
우리의 양식이 실제로 로드되고 있는지 확인하기 위해, 우리는 내비게이션, 헤더, 테이블 및 버튼이 모두 있는지 확인하고 싶을 것입니다.
describe("The MadLibs Main Form", () => {
it("loads successfully", () => {
// @ : ARRANGE
cy.visit("http://localhost:3000");
// @ : ACT
// None: Loading only
// @ : ASSERT
// ! : Navbar
cy.get("nav")
.should("be.visible")
.within(() => {
cy.get("h1").should("contain.text", "My Cool MadLibs");
cy.get("a").should("be.visible").should("contain.text", "Exit Site");
});
// ! : Form
cy.get("h2").should("contain.text", "Enter Your Choices!");
cy.get("table").should("be.visible");
cy.get("tr").should("have.length", 10);
cy.get("button").should("contain.text", "Complete").should("be.disabled");
});
});
TypeScript
복사
Cypress uses jQuery under the hood, but even if you haven’t used jQuery before, the .get method should be pretty easy to understand, as it uses the same syntax as CSS selectors. Put another way, it uses the a combination of JavaScripts .querySelector and .querySelectorAll:
it queries based on the selector and if one element is returned, then only that element is acted upon. If multiple elements are returned, then a collection is acted upon.
사이프레스는 보닛 안에(속 안에) jQuery를 사용하지만, 비록 당신이 jQuery를 전에 사용하지 않았더라도 .get 메소드는 CSS 선택자와 같은 구문을 사용하기 때문에 이해하기 쉬울 것이다. 다시 말해 자바스크립트 .querySelector와 .querySelectorAll의 조합을 사용합니다.
선택자를 기반으로 쿼리하며 하나의 요소가 반환되면 해당 요소만 동작합니다. 여러 요소가 반환되면 컬렉션이 수행됩니다.
Once you .get the HTML element you’re looking for, you can then chain multiple assertions. You might also notice that once we find a unique element, we can also limit our assertions to within that element using .within and a callback function, as we do above for our navbar.
Here, we’ve made the test longer and more detailed than it really needs to be, in order to demonstrate a range of basic assertions available to us:
찾고 있는 HTML 요소를 가져오면 chain multiple assertions을 지정할 수 있습니다. 또한 고유한 요소를 찾으면 위에서 navbar에서처럼 .within과 콜백 함수를 사용하여 해당 요소 내에서만 assertions을 한정할 수 있습니다.
여기서는 다양한 기본 주장을 입증하기 위해 실제로 필요한 것보다 더 길고 자세한 테스트를 수행했습니다.
•
.should('be.visible'): The element is visible to the user.
have는 알겠는데 be는? visible이 되는 것
•
.should('contain.text','My Cool MadLibs'): The element contains the text entered as the second argument.
2번째 인수의 문자열을 텍스트에 포함한다.
•
.should('have.length', 10): The number of elements returned should be 10.
•
.should('be.disabled'): This element should be disabled (i.e. not clickable).
disabled가 되는 것(클릭할 수 없는)
Open Source Session Replay
Debugging a web application in production may be challenging and time-consuming. OpenReplay is an Open-source alternative to FullStory, LogRocket and Hotjar. It allows you to monitor and replay everything your users do and shows how your app behaves for every issue. It’s like having your browser’s inspector open while looking over your user’s shoulder. OpenReplay is the only open-source alternative currently available.
프로덕션에서 웹 응용 프로그램을 디버깅하는 것은 어렵고 시간이 많이 걸릴 수 있습니다. 오픈 플레이는 풀스토리, 로그로켓, 핫자르를 대체하는 오픈 소스이다. 사용자가 수행하는 모든 작업을 모니터링하고 재생할 수 있으며 모든 문제에 대해 앱이 어떻게 동작하는지 보여줍니다. 이것은 브라우저의 검사기를 열고 사용자의 어깨 너머로 보는 것과 같습니다. OpenReplay는 현재 이용 가능한 유일한 오픈 소스 대안이다.
Adding some actions
Now that we know how to Arrange (e.g. load the page) and Assert (e.g. check things are as we want), let’s add arguably the coolest part of Cypress: ACTING!
We’re going to have Cypress fill out our form and make sure our story is exactly how we want it to be. Let’s do some automated MadLibs!
Firstly, does our button activate when all our fields are filled in? It’s important to separate out this test, because if it fails in future we can immediately identify that there’s an issue with our button, and not with our results.
첫째, 우리의 모든 fields가 채워지면 버튼이 작동하나요? 이 테스트는 분리하는 것이 중요합니다. 왜냐하면 나중에 실패할 경우 결과가 아닌 button에 문제가 있음을 즉시 확인할 수 있기 때문입니다.
describe("The MadLibs Main Form", () => {
it("loads successfully", () => {
// @ : ARRANGE
cy.visit("http://localhost:3000");
// @ : ACT
// None: Loading only
// @ : ASSERT
// ! : Navbar
cy.get("nav")
.should("be.visible")
.within(() => {
cy.get("h1").should("contain.text", "My Cool MadLibs");
cy.get("a").should("be.visible").should("contain.text", "Exit Site");
});
// ! : Form
cy.get("h2").should("contain.text", "Enter Your Choices!");
cy.get("table").should("be.visible");
cy.get("tr").should("have.length", 10);
cy.get("button").should("contain.text", "Complete").should("be.disabled");
});
it("activates the button when the form is filled in", () => {
//ACT
cy.get("input#animal").type("platypus");
cy.get("input#action").type("caressing");
cy.get("input#object").type("vacuum cleaner");
cy.get("input#food").type("popcorn");
cy.get("input#name").type("FLANJESUA THE ADORABLE");
cy.get("input#drink").type("chocolate milk");
cy.get("input#number").type("8");
cy.get("input#adjective").type("flowery");
cy.get("input#city").type("Copenhagen");
cy.get("input#mood").type("inconsolable");
//ASSERT
cy.get("button").should("be.enabled");
});
});
TypeScript
복사
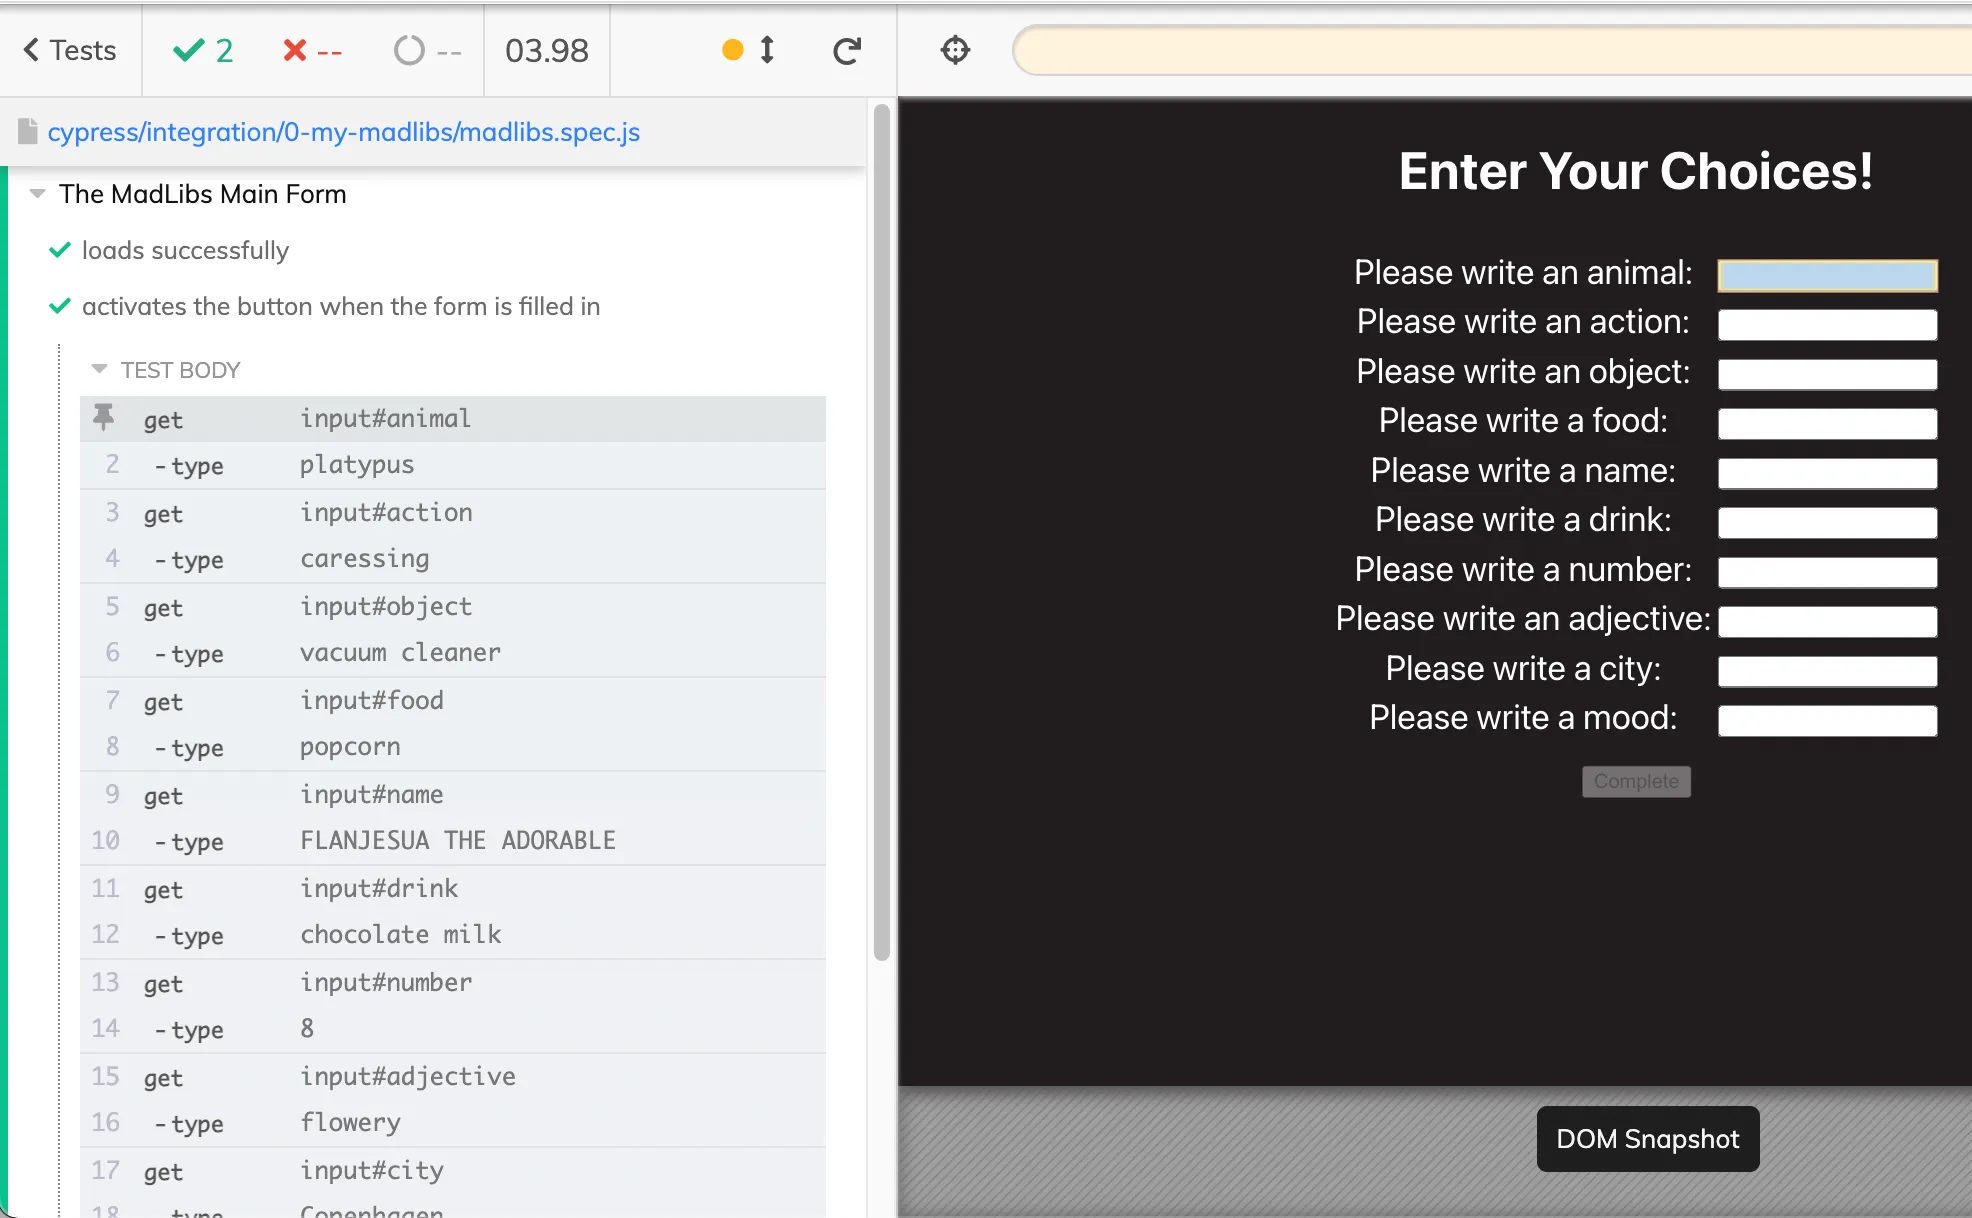
Saving this (or your own choice of entries) and observing the Cypress runner executing the test, you will see the form being filled out! COOL!
Since most forms will include other fields as well, here are some other form actions you can take:
이것(또는 당신이 직접 선택한 항목)을 저장하고 테스트를 실행하는 사이프레스 러너를 관찰하면, 당신은 form이 작성되는 것을 볼 수 있을 것이다! 멋지다!
대부분의 양식에는 다른 필드도 포함되므로, 수행할 수 있는 다른 양식 수행은 다음과 같습니다.
•
.check() or .uncheck() for checkboxes
•
.select('Germany') for select elements. For example, this would select the ‘Germany’ option.
•
.trigger('change') to trigger an event on a DOM element. For example, this could be the first step to triggering a value change on a slider input.
DOM 요소에 이벤트를 트리거합니다. 예를 들어 슬라이더 입력에서 값 변경을 트리거하는 첫 번째 단계가 될 수 있습니다.
Now let’s do the fun bit and click our button! More theatre, please!
it('shows the completed story with our input data',() => {
//ARRANGE
const finalStory = `Once upon a time in Copenhagen, FLANJESUA THE ADORABLE got out of bed to start their day. To their surprise, sitting at the end of their bed was an enormous platypus caressing the vacuum cleaner.FLANJESUA THE ADORABLE felt so inconsolable, they knocked over the glass of chocolate milk on their bedside table.Suddenly, the platypus spoke..."You must answer 8 flowery questions, or I will steal your soul... and your popcorn!"`
//ACT
cy.get('button').click()
//ASSERT
cy.get('div.results').should('contain.text', finalStory).within(() => {
cy.get('h2').should('contain.text', 'Results')
})
})
TypeScript
복사
Importantly, the other two tests here have also been part of the ‘Arrange’ step for us. We’ve set up the environment we need to act and assert for our final story. By keeping these in the same test file, we don’t need to rearrange the loading of the page, for example.
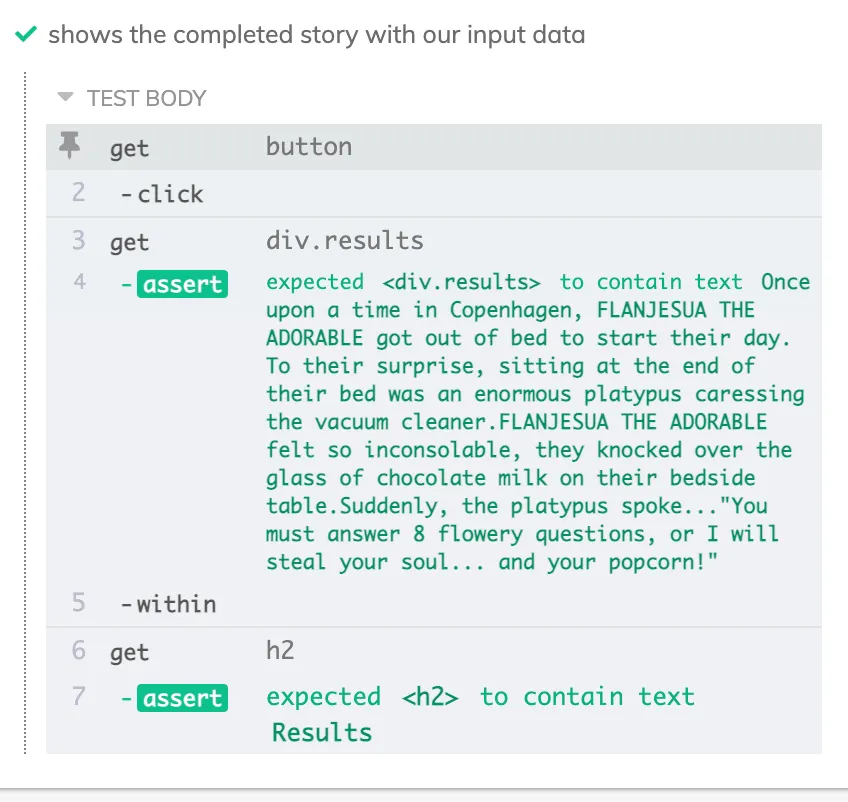
Here, we “Act” by running click() on our button. After that, we “Assert” by checking that our final story (here saved to a constant) is displaying properly, and then just for kicks we ensure our header has changed as well.
중요한 것은 여기 있는 다른 두 가지 테스트도 우리에게 Arrange 단계의 일부라는 것입니다. 우리는 우리의 마지막 이야기를 위해 act and assert해야 할 환경을 마련했다. 이를 동일한 테스트 파일에 보관하면 페이지 로드를 다시 정렬할 필요가 없습니다.
여기서는 버튼 클릭()을 실행하여 Act합니다. 그 후, 우리는 (여기에 저장된) 우리의 마지막 이야기가 제대로 표시되는지 확인하면서 Assert하고, 그리고 나서 단지 킥을 위해 우리의 헤딩도 바뀌었음을 확인합니다.
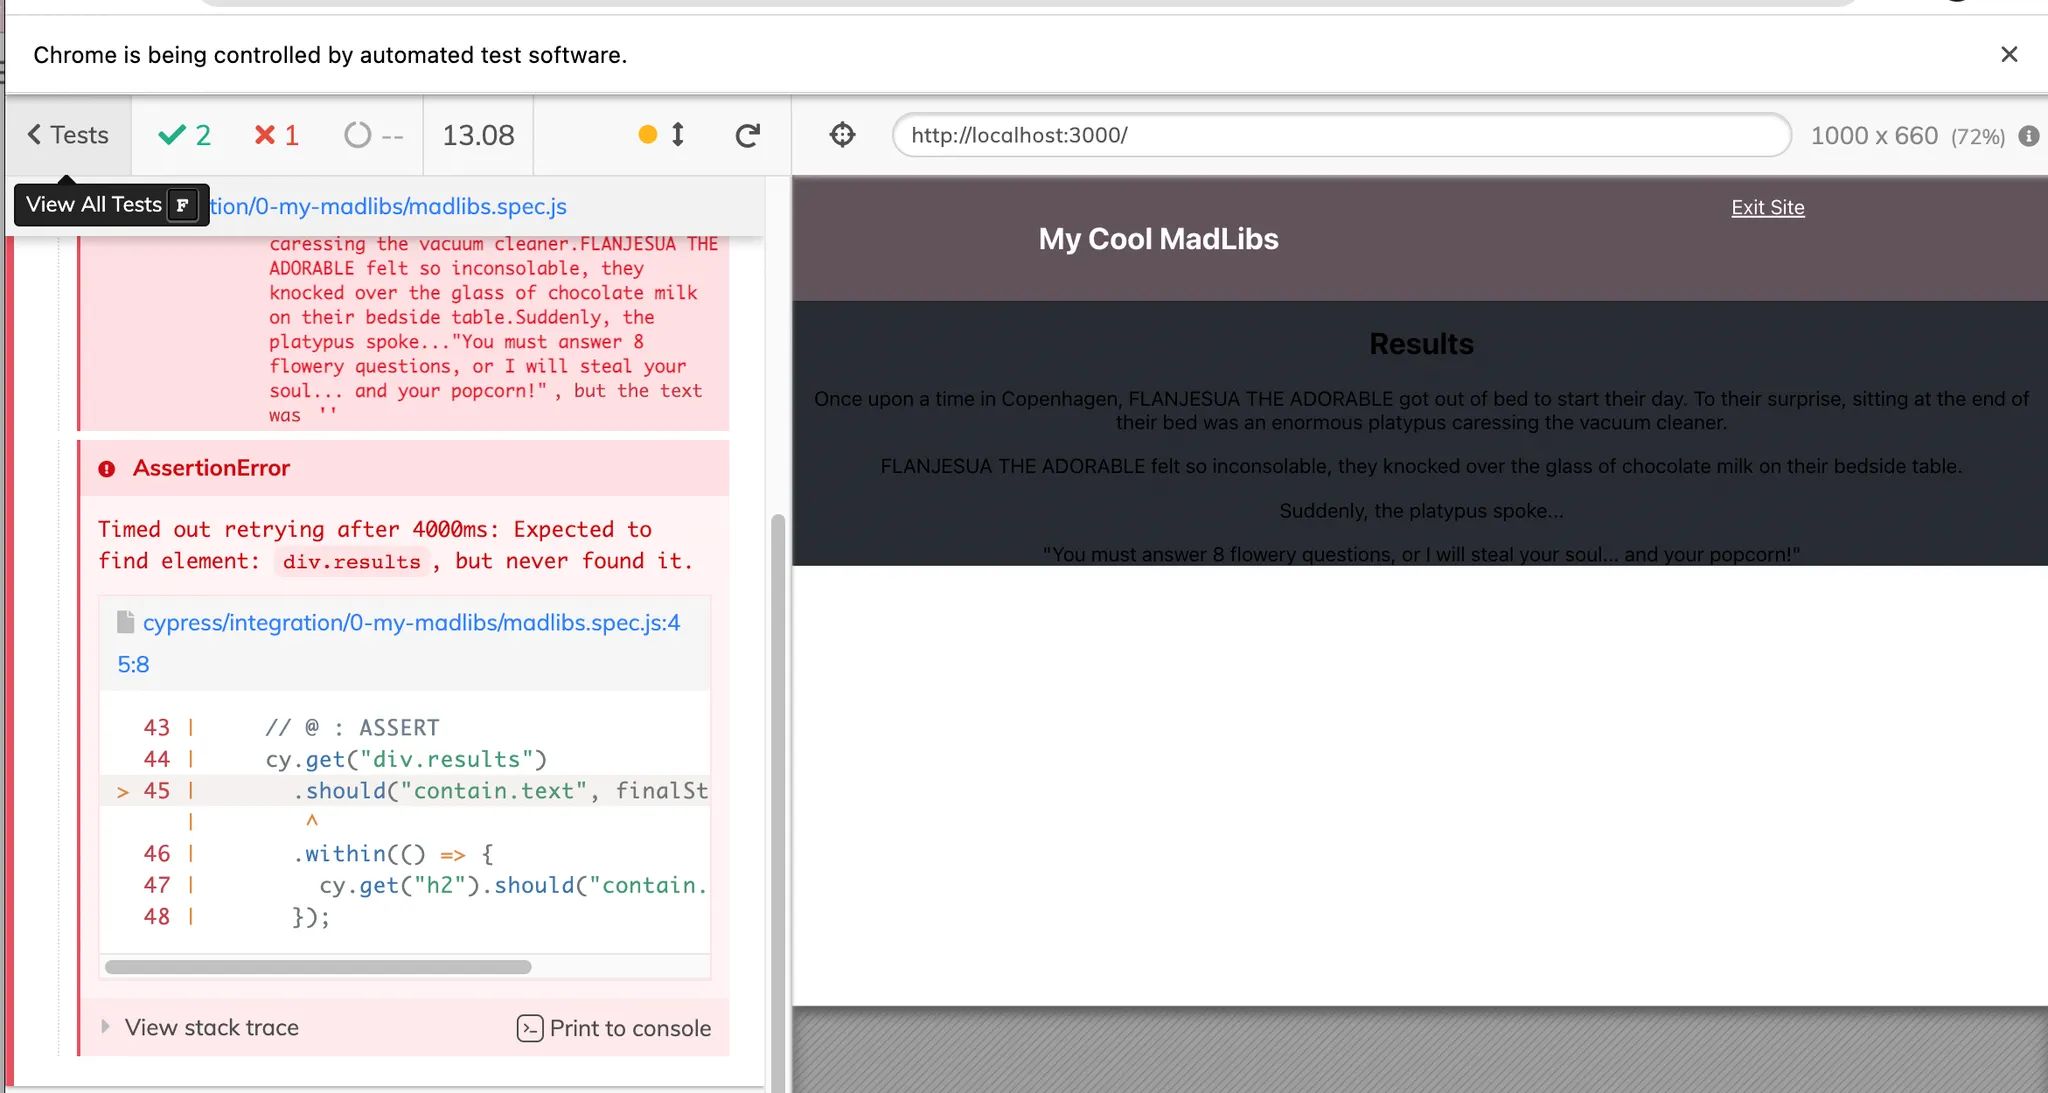
(스타일이 달라서 timeout 나온 줄 알았는데 div.result가 실제로 없었다. <div class=”results”>로 했더니 성공)
Wonderful! All tests pass!
Of course, clicking isn’t the only mouse event we can trigger, here are some others:
•
.dblclick()
•
.hover()
•
.rightclick()
There are a huge variety of commands available, of course. For a full list, refer to the documentation here.
Thank you! The basics make sense now! What’s next?
The beautiful part of Cypress is, of course, watching a huge suite of tests execute together. If we ‘break’ our app, in this example by changing our story, messing up our button disabled state, or accidentally importing too many fields, our tests will fail and we can know immediately that we’ve messed something up. By using descriptive naming of our tests and separating them out into distinct steps, it should also be clear what we’ve messed up.
If you want to expand your use of Cypress, then of course the docs are a good place to start, and I would also recommend looking into additional commands which can assist in a DRY approach, for example using .each() to loop through assertions. Most of Cypress can be learned through applying it to an existing frontend application and simply testing the bounds of how and upon what you can act and assert.
Used appropriately, Cypress can form the basis of a TDD approach to frontend development. Imagine a world in which we decide what we want our new feature to do and how it will look, describe it in Cypress in distinct steps, and then watch more and more tests pass as we build it out. Such an approach could help us plan our features more carefully, and keep us goal-focused when building it out.
감사해요! 이제 기본적인 것도 이해가 되네요! 다음은 뭐죠?
사이프레스의 아름다운 부분은 물론 거대한 실험들이 함께 실행되는 것을 보는 것입니다. 이 예에서 스토리를 변경하거나 버튼 비활성화 상태를 잘못 가져오거나 실수로 너무 많은 필드를 가져와서 앱을 '파손'하면 테스트가 실패하고 즉시 오류가 발생했음을 알 수 있습니다. 우리의 시험에 서술적인 이름을 사용하고 그것들을 별개의 단계로 분리함으로써, 우리가 무엇을 잘못했는지도 분명히 해야 한다.
사이프레스의 사용을 확장하고 싶다면 문서를 시작하는 것이 좋습니다. 또한 DRY 접근 방식을 지원할 수 있는 추가 명령어(예: 각각 .)를 사용하여 어센션을 반복적으로 수행할 수 있습니다. 대부분의 사이프러스는 기존의 프런트엔드 애플리케이션에 적용하고 당신이 어떻게 행동하고 주장할 수 있는지에 대한 경계를 간단하게 테스트함으로써 배울 수 있다.


